![The best gardening apps to help your garden grow]()
by Mark Bailey | Sep 21, 2017 | GardenLife Magazine, How to guide

Smartphones and gardening apps are not the first thing to spring to mind when you’re thinking about good tools for the garden. But modern technology has made gardening easier and more accessible than ever.
Answers to gardening problems or tips which once required a trip to the library or garden centre are now being carried around in our pockets, just a few taps away.
Here are a few of our favourite gardening apps to fuel your passion for all things green or improve your own patch.
The best garden planning app
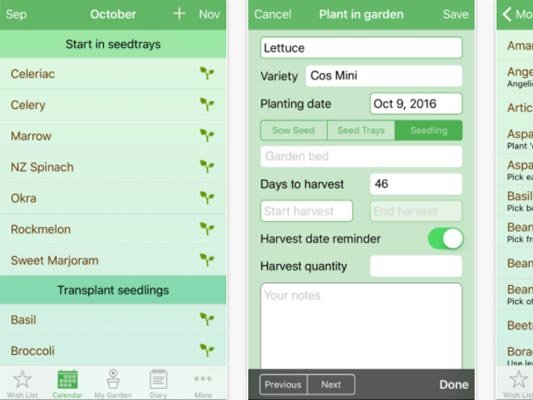
Garden Plan Pro – iOS, £7.99
Many of us have good intentions about growing our own fruit and veg or applying for an allotment, and then don’t quite get around to it. The Garden Plan Pro app could be the jump-start you need to get planning, digging, sowing and harvesting.
Don’t be put off by ‘Pro’ in the title – it’s aimed at beginners and allows you to create designs and your own ‘3D’ models of your ideal garden to see how it could all piece together – even telling you the ideal spacing for plants, and what plants would grow well next to each other.
What’s more, if you enter your location it will give you articles/tips etc for your own climate, as well as send you weather updates (eg a warning of frost on its way), and planting or harvesting reminders.
It’s certainly not the only app of its type on the market, but it’s a practical and user-friendly starting place.
The best garden scheduling app

Gardenate – iOS and Android, 55p
Timing can be everything in gardening, especially when it comes to planting and harvesting, and it’s one of the most daunting aspects for the beginner.
The 55p Gardenate app helps with this, by making a calendar on your phone with all the key timings – fertilising, feeding and so on – for just about any vegetable or herb you can think of. It also offers suggestions on the perfect plants to invest in depending on your climate and time of year.
The app covers Australia, Canada, New Zealand, South Africa and the USA, as well as the UK, so it’s quite generalised. For the UK, it has just two zones – cool/temperate for the north and west, and warm/temperate for the south and east – so the advice is not localised enough for some people’s taste. But it’s a good general guide, with a simple and lucid layout that’s intuitive to use.
Best gardening apps for identifying plants and weeds

B&Q Gardens App – iOS and Android, free
Not sure whether the thriving plants in your garden should be there or not? The B&Q Gardens app has a tool to help you identify common weeds and learn how to deal with them (using products from B&Q, of course).
There’s also an image recognition tool allowing you to take pictures of flowers you like (or that you have in your garden and don’t know what to do with), and identify similar ones in the B&Q range.
If you don’t find what you’re looking for on the B&Q app, there are plenty of other free or paid-for apps that will help you identify a mystery plant by uploading a photo.

Garden Answers Plant Identifier app – iOS and Android, free
Garden Answers app will identify plants from a photo you upload (using a data base of around 20,000 species). It’s also useful for novice gardeners as it has an enormous 200,000 strong library of common questions. The app itself is free though if you want an expert’s detailed advice on anything, there’s a fee.

SmartPlant (previously called PlantSnapp) – iOS, free
Another popular plant identification service, with the option of monthly care advice and reminders, and an ask-an-expert service (though note that a fee is payable for this last feature).
Best garden finder app

National Garden Scheme app – iOS and Android, free
If you’re looking for inspiration or just like exploring new spaces, the National Garden Scheme app is ideal. It shows you the location of almost 4,000 gardens open to the public as part of a charity scheme which raises money for nursing charities.
A quick search will show you all your local venues although bear in mind that most require a small entry fee or donation. Some gardens may also sell plants or seeds.
Best gardening app to make friends and influence people

Garden Tags – iOS and Android, free
Seeking to gain inspiration or advice from other enthusiasts? Garden Tags is a community-based app where gardeners share tips and tricks.
Think of it as a social network for all things garden where you can ask open questions or broadcast your progress. You can also play around with other useful features like the built-in gardening encyclopaedia.
Best rainy-day gardening app

English Garden app – iOS and Android, free
A handy digital version of the popular magazine, the English Garden app is ideal for those with a general interest in gardens, irrespective of whether you have one or not.
The app is free, but you have to pay for each copy. A number of other glossy gardening magazines also have good apps – for example, Gardens Illustrated and BBC Gardeners World – they’re all very professionally done, though bear in mind that their main aim is to get you spend money on subscriptions or single issues.
![Sloping garden design inspiration]()
by Mark Bailey | Aug 18, 2017 | GardenLife Magazine, How to guide
Sloping garden design inspiration

5 ideas for hillside garden landscaping
Designing your dream garden can be daunting at the best of times; if you have a sloping patch, things can seem especially tricky. But there are a host of ways to work around the tilt.
Here are 5 tips on how to turn your garden’s awkward angle into an asset. They’ll help you conquer some of the commonest problems with poor sloping garden design – such as difficulties with mowing the lawn, half of the garden being un-used or un-usable, or soil erosion.
They’ll also give you alternatives to expensive and heavy-duty landscaping and retaining walls.
Include terracing in your sloping garden design

The traditional way to overcome your garden’s gradient is terracing – basically turning a slope into a series of flat surfaces with different levels and steps.
This makes gardening simpler, and allows you to use different styles on different levels.
Terracing materials can also be an intrinsic part of the sloping garden design. You can use a whole range of materials to terrace your garden, including different types of stone, wood, metal sheeting, brick and even old tyres. These allow a choice of eye-catching surfaces if your garden slopes upwards, and you’ll find plenty of inspiration on websites like Pinterest and Houzz.
However, if your garden slopes downwards, there’s less opportunity to create interest through the actual terracing materials.
The downside of terracing is that it can be intensive in terms of effort and cost, particularly if your slope is steep. Unless you fancy a challenge, have a tiny plot or really know your stuff, it is wise to consult a professional landscaper or builder. But a good garden designer will be able to suggest cheaper alternatives to building expensive retaining walls and foundations, as this blog on using old railway sleepers in a design shows.
Another cost-effective option for creating terracing is gabions. These are wire cages filled with stone, commonly used in civil engineering projects, such as road building, but used in garden landscaping too. They can be cheaper than building retaining walls, and also look more contemporary, as an interesting blog by Alda Landscapes shows.
Use planting to improve your hillside garden

A great way to manipulate the feel of your sloping plot is to play around with what plants you place where in the garden. For example, on land sloping downwards from the house, planting tall foliage at the bottom can reduce your perception of the tilt.
However, planting tall plants or trees at the high end of an upward-sloping garden could make it feel enclosed and overpowering. And looking upwards at a border can make tall plants look absurdly tall and dominating. So, as this advice in the Guardian shows, if you plant a border on a slope, you may have to relearn the rules about what should be planted where.
Plants can also be used to stabilise a slope and prevent soil erosion. There’s a good selection of low-maintenance, groundcover plants suitable for the steepest of slopes on this site, and they can add colour and texture to your sloping garden design..
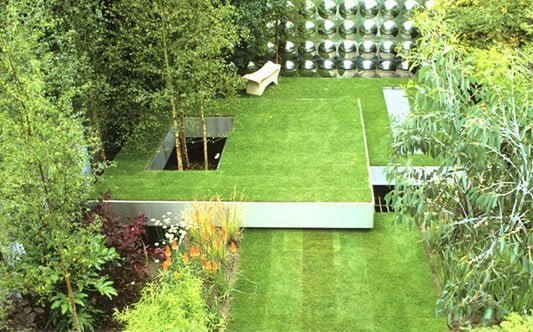
Decking in a sloping garden design?

Installing decking and creating a wooden patio-type feature at the bottom of your garden can look really good as it will give the garden a focal point and catch the eye (in turn drawing attention away from the slant). It can also transform a neglected, unloved part of the garden into a social area, where you can entertain.
It can enable you to install a showpiece structure (which could be otherwise impossible given the incline) such as a water feature or pergola which is sure to be seen. And installing a garden shed or summer house on decking means you don’t have to worry about uneven, sloping foundations, or water pooling.

Do, if you have neighbours close by, do careful about installing a summerhouse or shed at the top of a garden slope – the effect could be a bit like a watchtower, with the neighbours feeling they’re under unwelcome scrutiny all the time (the photo above is of the lovely GardenLife Claudia clock-house style summer house positioned right at the top of a steep slope in a customer’s back garden – not our call).
For ideas on how to use decking in sloping gardens – plus words of warning about some of the pitfalls – have a look at the top deck website.

This is an aspect of sloping garden design where an angle is actually really useful as it gives you scope to install kinetic water features. Instead of a sedentary pond, you could have multiple pools connected by streams or small waterfalls (since the slope and gravity will do most of the work for you) – your very own miniature version of the famous waterworks at Chatsworth.
Or you could create a mini river-rapids style rock cascade – the Falls of Clyde in your own backyard. Having a dynamic feature like this could really command attention and bring the garden alive.
If you don’t have Chatsworth’s Capability Brown to design your water feature for you, there’s a good selection on the Primrose website.
Paths in a hillside garden

If terracing or decking are too high maintenance and/or costly for your sloping garden design, creating a inclined, winding walkway can reduce a slope’s prominence (whether it slopes upwards or downwards) and create a journey-like effect.
An S-shaped path with large sections of foliage will break up the space and take attention away from the slope whilst the hillside will give the path dimension.
However, if your garden’s list is particularly drastic, getting up or down path could prove impractical in winter weather or for the elderly, even if the path snakes across the hillside.
There is good basic and practical advice on building a garden path on the Wickes website.
Whatever you choose to incorporate into your new sloping garden design, the inspirational ideas, examples and links above should help get you started.
![Square garden design – how to best transform your limited space]()
by Mark Bailey | Apr 3, 2017 | GardenLife Magazine, How to guide
Square garden design – how to best transform your limited space
This month in our series on garden design ideas for different shapes of gardens, we’re tackling an all-too-common horticultural gripe; how to come up with a unique small square garden design. If you live in an urban or suburban area, it’s quite likely your garden is a little square-ish shape – not exactly the stuff of garden design fantasies.
But don’t be defeatist – with the right tricks, your handkerchief of a backyard can be transformed into a far less square, more spacious-looking area. To help you do this, here are 6 tips to create an inspiring and roomy square garden design with your box-like plot.
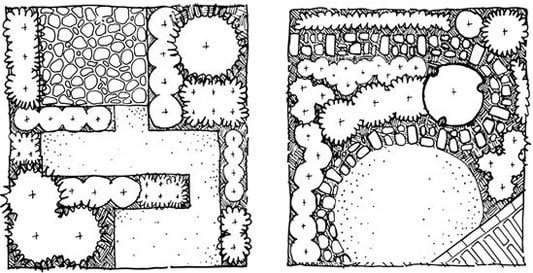
Curved lawns complement a square garden design

Let’s face it – a square garden with a square lawn isn’t particularly exciting. If you want to jazz things up, try changing your lawn shape – circular, oval or curved irregular shapes will all distract the eye from the box shape, and make your garden appear more creative.
Curves and arcs also create more opportunity for interesting borders, beds or small vegetable patches, or for foliage to break up the lawn. However, when using foliage to create visual interest, be wary of shrubs that are likely to grow too vigorously outwards – they will end up turning a compact square garden design into an even smaller one.
If you decide to use lawn shapes to break up the square, lawn edging is essential to keep the lines crisp and defined. Have a look at the different options for edging materials (from metal to bamboo to eco-materials) on the Primrose website.
Complement or contrast with borders and paving

Having borders, walkways and lines in your garden can take away from its squareness and create more of a visual (as well as physical) journey around the garden.
This approach can also help you create different sections, for example, a sinuous path to a relaxing or dining area can transform the look of the garden, and also the way you use it.
Wooden boardwalks are inexpensive but if you’re after a more robust alternative, stone bordering and edging are more versatile in terms of shape. And if you decide on a border for your new square garden design, there’s an inspiring ‘cheat’s guide’ to starting a border detailed in this article on the Guardian website, including the very tempting Garden on a Roll that does virtually everything for you except dig the bed.
Add height, steps or levels to break up your square garden

Introducing differing vertical aspects to your garden will help spruce up its appearance and profile as well as creating more interesting features.
You can combine this approach with the ‘journey’ tip above by raising your walkways or perhaps giving your decking some height, perfect for an al fresco dining section. Even a larger structure like a pergola or arch can do the job, as can raised beds around a central lawn.
A more natural approach is also effective – a row of small trees or tall plants like delphiniums contrasted with low plants can create interest and intrigue. There are some good ideas for tall border plants on the Thompson & Morgan site.
Use the walls or fence around your square garden to enhance it

In too many suburban and urban gardens, the walls or fences are bland or even ugly – they restrict your garden and act as boundaries, without actually adding any visual interest at all.
An excellent way to combat this can be to incorporate the boundaries into the design. Planting climbing plants up trellises on a wall or fence will create a more natural and organic feel, and make the garden feel less confined, without eating up as much space as a border.
You could even hang flower baskets or planters on a wall or fence, extending the planting space if your garden is tiny. For a good selection of wall planters have a look at the Woolly Pocket site.
Alternatively, try integrating raised beds with seating areas or a fountain into the fence or walls around the edge of your square garden design.
Sectioning; break your square garden into different zones
If you can take in everything in your garden at first glance, its squareness is going to be immediately obvious.
A great method to fix this is to compartmentalise your garden into different sections with different purposes. You can divide using borders, tall plants or trellises.
A dining area either right next to the house (for convenience) or at the far end of the garden (for a more getting-away-from-things feel) could be useful, while a shady spot, kids’ play area or small vegetable patch could be useful and easily accomplished.
There are some inspiring ideas for small gardens (though not all of them are square in shape) on the Ideal Home website.
Add a structure or garden building to disguise the square shape

Having a focal point to grab the attention will disguise the squareness of your garden – whether a pergola, gazebo, summer house or garden office.
Bear in mind a non-square or non-rectangular shape will likely achieve this goal better, as well as using space more efficiently, so look at corner buildings and circular or hexagonal shapes.
Remember that, in most circumstances in the UK, a building within 2 metres of a boundary wall will require planning permission if it is over 2.5m high, so take this into consideration when choosing a structure. Garden Life has a wide selection of sub-2.5m buildings available here.
Hopefully these tips and inspirational ideas will help you generate some great ideas for your own square garden design.
![Want to grow your own veg? 7 tips for planning a vegetable patch]()
by Mark Bailey | Mar 21, 2017 | GardenLife Magazine, How to guide

Want to grow your own veg? 7 tips for planning a vegetable patch
Whether to fuel your gardening passion, improve your eating habits or occupy some free time, vegetable patches can be a surprisingly fruitful (excuse the pun!) and rewarding endeavour. With spring here, you might be thinking about ways to spruce up your garden or spend more time outdoors, so here are 7 things to consider if you’re planning a vegetable patch so you can grow your own veg.
1. Sun – you need plenty of light to grow your own veg

Given that most vegetables want at least 6 hours of sunlight to grow well, you’ll want to find a spot with direct sunlight – it’s definitely a case of the ‘the more the better’ – with tomatoes and peppers especially.
However, don’t stop planning a vegetable patch if you live somewhere less sunny – while no veg will grow in complete darkness, leafy vegetables such as spinach, cabbage, lettuce and (admittedly, you may not want to know this next one) Brussels sprouts, can all grow with about 3 hours of direct sun, or obstructed light throughout the day. You can even grow multiple mushroom varieties from a log kept in complete shade.
2. Size – planning a vegetable patch that is right for you needs

How big a patch you create really depends on the purpose of your patch – for a beginner, a 2m x 3m patch should be more than enough to keep you occupied and the salad bowl full, while a 6m x 4m vegetable patch will feed the most veg-hungry of families.
Most vegetable patches are made up of multiple rows (running north and south for sunlight), and if you are unsure about sizing/future expansion, buying multiple raised beds can offer great flexibility.
You can find a good selection of smaller raised beds on the Green Fingers site, or if you are apt at DIY you could consider planning a vegetable patch that you can build it yourself.
3. Pest control – how to keep bugs off your precious veg

When it comes to pest protection, the best approach is often a natural, non-chemical one. Removing weak plants and weeds and keeping your soil moist and healthy can all prevent future pest issues whilst planting sunflowers attracts ladybirds who will eat small pests like greenflies.
Neem powder – a natural organic by-product from the processing of Indian Neem seeds for oil – is full of essential nutrients and is a natural pesticide (plus most cats don’t like it as well).
You could even install a pond – frogs and toads are great at keeping insect numbers down and can certainly liven up your garden!
There’s more info on ecosystem-based pest control on the Grow Veg website – a very good read if you’re planning to grow your own veg.
4. Drainage – getting the right moisture levels for your veg

Ensuring proper drainage is vital when it comes to growing your own veg – water should be properly absorbed by the roots but not drain away too quickly. Whether or not this happens largely depends on your soil type; for example, clay and silt-based soil tends to drain poorly, while chalk will clump.
If you’re not 100% sure what type of soil you have it is best to check.
As those articles point out, it’s not only the drainage of your soil that will influence your success at growing various type of plants (not just veg) but also the acidity and nutrients of your soil. If you’re serious about wanting to grow champion veg, then there’s a more detailed guide to soil preparation available here.
Once you’ve found out what type of soil you have in your vegetable patch, you should check that your vegetable wishlist is likely to thrive in it – for example, carrots are notoriously difficult to grow in heavy soil, and much prefer light sandy soil.
5. Organic – grow your own veg without the need for chemicals

Whether you make your garden organic – basically, where you don’t use any chemical or synthetic products in growing your patch – ultimately comes down to personal preference.
While an organic patch could be cheaper (if you don’t have to keep buying costly chemical fertilizers and pesticides) and generally better for your health and the environment, it can make heavier demands on your time.
If you want a higher yield for less time and effort, opt to spend money on organic supplements and fertilizer, or choose the non-organic option. Neem (mentioned above), liquid seaweed fertilizer, fish, blood and bone and wood ash are all available with organic certification, and all can significantly improve soil health, fertility and vegetable yields without the need for harsh chemicals.
The National Allotment Society has a good column on organic versus inorganic too.
6. Basic veg – keep it simple when it comes to planning a vegetable patch

Now for the most obvious part – what you actually grow! Herbs, Salad leaves, garlic, onions, leeks, peas and potatoes are all easy and something of a staple whilst of the root veggies, beetroots are also simple to grow; if you’re looking for more of a challenge, plant carrots. Tomatoes and cucumbers are useful in cooking terms as they can be harvested over a longer period, and a lot of varieties don’t require a greenhouse to grow well.
All the well-known garden websites sell a large selection of veg seeds, as will local DIY shops. When planning a vegetable patch also consider how you will store your harvest if it all needs picking at the same time. Leafy greens can be picked at throughout the season, but you may need space to store onions, potatoes, carrots, leeks and garlic.
7. Budget – how much does it cost to grow your own veg?
If you can go without planning a vegetable patch that requires raised beds, or already have the perfect patch, moving into DIY veg production can be done for an extremely low price. For a 2m x 3m patch, expect to pay about £25 for all your seeds; compost shouldn’t be much over £20; your fertilizer or pesticides bill will depend on your approach to organic vs inorganic.
Raised bed are very convenient, but will set you back around £50, and the more complex your design or rows you have, the higher the price tag. All in all, though, it can certainly be a cost-effective endeavour – over time the vegetables pay for themselves (as long as you don’t count the cost of your time!) and your costs will dip after the first season (especially if you make your own compost and harvest your own seeds).

Lastly, don’t forget how convenient it can be to have a little potting shed to work in during the spring and summer (and to store your harvest in autumn).
![Creative ideas for a long narrow garden design]()
by Mark Bailey | Jan 18, 2017 | GardenLife Magazine, How to guide

This month we start a series of blogs on garden design for different shapes or sizes of garden, and we begin with a British classic: the long narrow garden.
One person’s problem is another person’s opportunity, and so it is with gardens. Some people complain about having a plot that’s nothing but a boring corridor, others see a long, narrow garden as a chance to come up with a creative design.
We prefer the latter mindset. It’s become a bit clichéd to talk about ‘spaces’ and ‘rooms’ within a garden, but this works brilliantly with long thin gardens. And their narrowness makes them easier to manage – less daunting than a huge, wide space. So here are some creative tips to get the most out of a long narrow garden design.
Break up your long narrow garden into different rooms
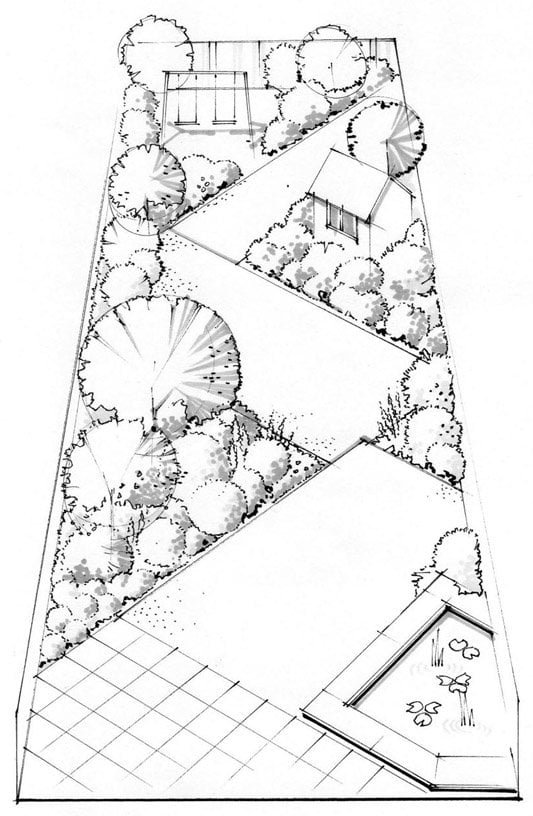
First things first: the essential with a long narrow garden is to break up the space. What you don’t want to do is look straight down to the end. Great in a 100 metres track, less so in creative garden design.
Instead, use shapes, plants and structures to create screens. Plants, pergolas, trellises, decking, paving and paths – these can all turn a thin corridor into a series of different areas. There are good tips on this and some sample plans on the Ideal Home website.
Many garden designers prefer these screens to be partial rather than full – letting you catch glimpses of what’s beyond, rather than completely blocking off the section behind them.
Plan different garden zones for varied uses

How many rooms depends on the length of the garden and on your lifestyle. A good blog describes dividing a long thin garden into three areas – an area by the house for a quick cup of coffee; a sunken garden; and a screened eating area at the far end with table and chairs.
Clearly, this is not the only possible combination, but it’s helpful as a conceptual starting point. Other possible ‘rooms’ could be: children’s play area; vegetable patch; barbecue or hot tub area; or shaded area with bench. Where these rooms go – closer to the house or at the far end – depends on your own preferences.
When designing different spaces, it’s advisable to sketch and make a scale plan beforehand to ensure everything (including buildings and other features) will fit properly. The excellent garden design guide on the Garden Power Tools website has good advice on doing this.
Furnish each room within your garden

Having thought about a series of rooms, you need to furnish them. Plants, of course, will be critical in this, but garden buildings and furniture will also help.
So far we’ve mentioned pergolas, trellises and benches. How about going one step further and integrating a gazebo, summer house or workroom into your design?
One common objection to traditional long narrow gardens is that the far end sits unused and unloved. Turning the end into a destination, with a hot tub and gazebo, barbecue area, garden office or extra dining area can transform the way you use your garden.
Planning permission and long narrow gardens

The general situation with planning permission in the UK is that a garden building within 2 metres of your boundary should be no taller than 2.5m at its highest point. Otherwise, you need planning permission.
Therefore, for owners of long narrow gardens, the low-admin solution is to have a garden building that meets the 2.5m rule. GardenLife sell a variety of sub-2.5m buildings suitable for a compact space, including traditional summer houses, contemporary workrooms, storage sheds, playhouses and gazebos.
Design-wise, a rectangular garden building that takes up the whole width of a narrow garden may painfully emphasise the narrowness. So be creative.
For example, a corner cabin can maximise the space available as well as look more interesting than a square-on building. And a modern summer room with tall windows will draw the eyes upwards and distract from the garden’s lack of breadth.
Or a gazebo can add interest and weather-cover without blocking the view.
Mind the edges, climbers are better than hedges
With a traditional long narrow garden, it’s hard not to miss the edges! If you have beautiful stone garden walls or perfect borders, then lucky you. The rest of us may need to hide an ugly fence which a glance to the left or right can’t help revealing.
Trellises with climbing plants (parallel to the edge) can usefully disguise a fence, as can a narrow border. On the other hand, seating and benches next to a fence can draw attention to it.
If you do use plants to screen a fence, be sure to choose ones that will grow upwards, rather than outwards (making the garden narrower). Also keep edges neat and trimmed back.
Gardens are not just for summer
When planning your design and planting, imagine what the garden will look like throughout the year. For example, how will your screens of plants look if they have no foliage in winter?
Good tips for a four-seasons approach to planting in a long narrow garden can be found in a detailed, but useful, article on House Beautiful. A simple rule of thumb is to mix deciduous and evergreen plants throughout the design for your garden. Even in the bleakest of winters you can then still enjoy some greenery.
Plants are not just an afterthought

One problem with garden design approaches based around ‘rooms’ and ‘spaces’ is that they sometimes forget about the plants and purely focus on textures and space. Decking, paving, gravel, paths, walls, ponds, trellis, pergolas and garden buildings can all enhance a long narrow garden, but without some creative planting it will look lifeless.
With long thin gardens especially, plan your plants from the outset – thinking about size and the shade they create (and need) as well as what might grow well in your garden. If you’re new to choosing plants (and making them thrive), this Garden Power Tools post will tell you all you need to know.
![How to heat a garden room]()
by Mark Bailey | Dec 21, 2016 | GardenLife Magazine, How to guide

How to heat a garden room – the best options and their pros and cons
With winter well and truly underway, ‘tis the season to be keeping your timber garden room snug and warm. Ideally, your shed or workroom will already be well insulated and draft proof – think dense timber walls, double-glazed windows, and quality flooring and roofing.
In addition, you can employ a variety of heating solutions to cope with any temperature the British weather can throw at you. So, to help stay warm and toasty this winter, here are 5 ways you can heat a garden office and transform it into a cold-proof refuge.
Using a wood-burning stove to heat a garden room

A very traditional form of heating, wood stoves offer both Nordic charm and excellent heating practicality, though they do need cleaning (emptying the ash pan and an occasional wipe of the glass in the door). All that’s required is some room to store logs, plus firelighters and kindling to provide ample heating for a medium-sized garden room.
Wood burners can cost from £500 to £2,000 and are available in rustic or more contemporary styles.
£100 should buy enough seasoned wood to last a stove the full winter, or you could make your waste paper into eco-friendly logs or briquettes using a log maker. These can cost less than £25 and are available from a number of online stores.
The downsides of wood burners include: the amount of space they take up; safety considerations (you’ll need a hearth and fireproof lining between the stove and timber walls); limited controllability in terms of heat output; and installation costs. If you do go for a stove, installation by a HETAS registered professional is advised.
When you consider the overall cost of the hardware and installation, a wood burning stove definitely isn’t the most cost effective way to heat a garden room. However, there’s nothing quite like sitting in a timber garden office in winter with a real fire flickering in the corner and the smell of wood smoke in the air.
Buying an electric stove to heat a garden office

If you want the look of a wood-burner without the need to store fuel and install a chimney, there is the option of an electric stove. These can be turned on and off instantly, need no cleaning, and there is no work involved in lighting them or maintaining the heat.
This is obviously labour-saving, but may not appeal if you like the ritual of lighting the stove or prefer the aesthetic of a ‘real’ wood-burner with ‘real’ wood. A browse on the Stovax website will give you a good idea of the range of designs and prices available.
Heating a garden room with an Oil-filled electric radiator

These are generally free-standing radiators which you plug into a socket to heat up the oil. They are very portable, require no installation, and are available in a wide range of sizes and styles. You can also buy wall-mounted models if you want a fixed source of heat, and it is also possible to buy models with thermostats and timers.
More versatile than a stove, they are also very cheap to buy, starting from about £25 and available at DIY stores. When it comes to heating a garden office you also save on the installation costs of a stove.
In terms of running costs, they will set you back around 20p an hour on a standard electricity meter – cheaper than a fan heater or radiant electric bar fire. After they have been switched off, oil filled electric radiators also retain their heat for some time (unlike fans or electric stoves, which lose their heat straight away).
Those are the pros; the downsides include: you may require more than one radiator if you want to heat a large garden room, especially since average heat output is lower than stoves and fan heaters. Additionally, they can take a while to warm up.
How to heat a garden room with an electric fan heater

Hugely portable, quick to buy and simple to operate, these are the easy choice for those who don’t want the hassle of having a stove installed, or just want occasional heat. You plug them in and you’re good to go, with instant heat. They can cost as little as £10 upfront.
However, this convenience comes at a price – they are more expensive to run than oil-filled radiators, setting you back nearly 30p an hour, which can build up over a full winter. Also, given their size, you may need several of these if you need to heat a large garden room or office. And though you can buy different sizes and designs, you’ll probably struggle to find one that will win you credibility points for style.
Heating a garden room with a portable gas heater

Again, these rarely make people’s wish lists of covetable design items, but traditionally they are a popular way to heat garden rooms and offices because you don’t need a power source. They’re portable, have no installation costs, have high heat output, and the heat is easily controlled.
All great attractions, but they are generally bulkier than electric heaters (because of the gas cylinder); and there are a couple of safety precautions. One is that you’ll need to ensure that the garden room is well ventilated when the fire is on (so that fumes and condensation doesn’t build up). Secondly you need to watch out for carbon monoxide leaks – buying a battery operated CO2 detector will solve this issue.
The most unusual way to heat a garden room

If you are planning to buy a garden room and are researching ways to heat it and want something truly novel, you could consider a Scandinavian style barbecue hut! GardenLife make and sell a small BBQ hut and a large hexagonal barbecue hut that can be purchased with an optional central grill and smoke extraction hood.

The design of these timber cooking huts was heavily influenced by traditional Swedish architecture and allows space for seating around a central stove. GardenLife sell the be barbecue grills, fixings and fittings with the huts. If you’re after a different look and a novel way to heat your garden room, this could be the option for you! You could entertain friends on even the coldest of winter days, stay warm around the fire, and even cook your dinner on the grill!
In summary; the pros and cons involved in heating a garden room or office
Wood burning stove
Pros: Choice of traditional styles, sustainable fuel, relatively low running costs, traditional atmosphere
Cons: Purchase and installation cost, space occupied can be large, limited heating controls, cleaning required, storage space for fuel required, ongoing maintenance costs, ventilation and CO2 detector required
Electric stove
Pros: Instant heat, thermostatic control, no maintenance costs, no fuel storage required
Cons: Medium to high running costs, requires mains electricity, limited traditional designs available, no heat retention when turned off
Oil-filled electric radiator
Pros: Low to medium running costs, wall mountable, thermostatic control, no cleaning, no maintenance costs, no fuel storage required, retains some heat when turned off
Cons: Lower and slower heat output than stoves, requires mains electricity, no traditional designs available, may require two or more units
Electric fan heaters
Pros: Highly portable,compact, cheapest to buy
Cons: High running costs, requires mains electricity, limited heat output compared to stoves, no traditional styles available, no heat retention when turned off, may require two or more units
Gas heaters
Pros: Low running costs, no mains supply needed, instant heat, heating control, no maintenance costs
Cons: Bulky design, limited traditional designs, ventilation and CO2 detector required
BBQ hut with grill
Pros: Beautiful traditional Scandinavian design, heating and cooking area combined, sustainable fuel, relatively low running costs
Cons: Purchase and installation cost, no heating controls, regular cleaning required, storage space for fuel required, ongoing maintenance costs, ventilation and CO2 detector required
All in all, there’s a great range of choice of solutions for surviving the bleak midwinter, although it’s fair to say that every solution has its downsides as well as its attractions. If you want a more detailed comparison of running costs, the Centre for Sustainable Energy has useful information.
Beyond buying, installation and costs, other criteria for your choice heating appliance for a garden room should include:
- how much space you have
- whether you want occasional or ongoing heating, and freestanding or permanent solutions
- safety issues, for example ventilation and whether you work with flammable materials such as sawdust (in which case you won’t want an exposed heating element)
Enjoy the winter!


