by Mark Bailey | Apr 3, 2014 | How to guide, Website updates

Garden building contruction video guides now online
When it comes to buying online it’s not possible to get a real feel for the item that you’re interested in purchasing. That’s not so important with some things, but when it comes to understanding the quality, materials and construction of a timber building, summerhouse, garden room or log cabin, getting detailed information and advice is a must.
In addition to the photos, descriptions, specifications, PDF manuals and FAQs on the GardenLife website (not to mention the wealth of information in the heads of our knowledgeable staff available on 0131 660 6333) GardenLife has added a range of garden building contruction video guides to help showcase even more of the details our garden buildings.
These helpful video guides cover the delivery of a garden building and how to unpack the parts. When constructing a summerhouse or garden building getting the base right is of vital importance, so we’ve also showcased that. Another video guide shows how the easy fit tongue and groove timbers fit together and how window and door frames are slotted into place.
Construction video guides also cover roof elements such as fitting roof boards and making a summerhouse water tight by adding felt shingles, as well as installing insulation and floorboards to keep the building warm. We’ve also included a video that highlights how our modular Quick Fit buildings are constructed too (ideal if you’re not so good at DIY).
We hope to be adding more garden building contruction video guides in the future, but as ever, if you have any questions or comments just get in touch with us.
by Mark Bailey | Jan 16, 2014 | How to guide
Ever wanted to know how a timber summerhouse is built? Interested in one of the many GardenLife log cabins or timber buildings but not sure if you’ll be able to build it yourself? Well why not make a cup of tea or coffee, grab a biscuit and watch this video on how a timber summerhouse is built (in this case, it’s the lovely Wye clockhouse-style summerhouse). You can see how the different elements are laid out first, almost like building blocks. Watch as numbered timber sections are easily dropped in place, and how the two-man construction crew build this garden summerhouse in straight forward stages with basic DIY tools. From the floor to wall elements, windows to the roof, it’s all covered in this helpful video. Any questions? Just get in touch for more information.
by Mark Bailey | May 1, 2013 | How to guide
To the uninitiated buying a log cabin from a position of little knowledge of the product can be a confusing business. Please see below a list of criteria and definitions to look in to when purchasing. Hopefully this guide will help to point you in the right direction!
Log thickness – this is the thickness of the wall log. These can vary from 28mm thick up until 70mm and even thicker for larger accommodation type buildings. Generally garden buildings will have a log thickness of 28mm or 44mm. For all year round usage you really want a minimum of 44mm but for summerhouse usage the majority of buildings have a 28mm wall thickness. For larger games rooms and amenity cabins people generally go for 70mm log walls or 88mm for holiday type chalets.
Window and door quality – these can vary vastly from manufacturer to manufacturer. Key points to establish are whether the windows and doors are double glazed or not. Generally for all year round usage it is recommended that you have double glazing. Thickness of double glazing can also be a factor and always wise to check both glass thickiness and width of cavity separating glass. The larger the cavity the better the double glazing ! Some suppliers also use laminated timber in their window and door frames which helps them to remain more stable. Laminated timbger helps prevent movement caused by uptake of moisture. Where non laminated timber has been used warping can distort frames which brings with it associated problems of leaks and drafts. Some log cabins also have “top hung” windows which do not allow them to open fully.
Floor and ceiling material – be sure to establish both floor and ceiling material is tongue and grooved softwood timber rather than chipboard or other mixed fibre type boards. Floor thickness can also be an issue – floorboards generally come in 19mm or 28mm thickness. Likewise roof boards can come in 16mm/19mm or 28mm thickness. Obviously the thicker the timber the longer lasting the floor. Thicker timber will also give a better insulation.
Roof purlins – most log cabins have roof purlins which run from apex to apex. An indication of the quality of the cabin can be the thickness of these purlins. Thicker purlins also have a greater aesthetic appeal!
Hopefully some of the above pointers of use – it is worth making sure you buy the right log cabin for the purpose you wish to use it for!
We are always happy to answer any general enquries at info@gardenlifelogcabins.co.uk
Happy cabin hunting!

by Mark Bailey | Oct 30, 2012 | Customer feedback, How to guide
At GardenLife Log Cabins we always love receiving reviews and testimonials of our products from customers. Some recent feedback was so detailed however that we’ve decided to include it in our blog as a guide to other customers wishing to assemble the Hanna summerhouse themselves:
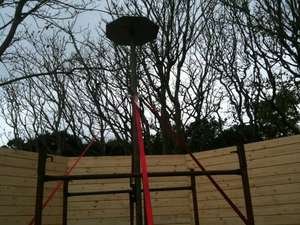
 “Thank you for your advice on the telephone on Monday which was greatly appreciated. Following your advice I decided to fabricate an adjustable height support pole from a scaffold pole and then fitted to the top of the pole a steel hexagonal plate that would support all 8 roof sections at the correct centre height. I bolted the centre of the pole support base to the centre of the summer house concrete platform and then 4 way guyed the pole to ensure it was both secure and centre vertical. I surrounded this pole with a scaffold tower to create a support platform from which the panels could then be be manually adjusted into position on the hexagonal plate. Weather remained kind and rain was not forecast until Saturday night so left time to Cuprinol seal and protect the wood of the wall and roof prior to final completion.
Saturday morning arrived and my brother and son-in-law arrived. All eight panels were slid into place by two of us pushing them up towards the centre support with the third person on the scaffold tower juggling the panels onto the steel hexagonal plate, following which, as suggested by you, the panels were then temporary secured with one centre screw at the roof panel’s base so allowing flexibility to adjust during positioning of all the other panels. A certain amount of juggling and adjustment was required to settle in the 8 panels onto the wall but all this was completed within an hour and we were having a celebrational coffee by 11 am.
 The roof was then felted to temporary protect it from the forecast rain and when the weather again settles I will either tile it with the felt shingles you kindly provided or alternatively purchase some cedar shingles so completing the roof seal prior final wall weather treatment.
Thank you again for your help and guidance with the completing of the roof which, due to its weight was originally an onerous task, but after thinking about and putting your comments into action was quite straightforward process. Finally the engineering/manufacturing of the walls, windows, doors and panels panels was all to a very high standard and the quality of the summerhouse, when completed, will be excellent.
Thank you for stocking and marketing a quality product and assisting me with the initial purchase, delivery and building considerations.”
Well there you go; a customer’s guide on how to erect the Ribble summer house!


 The roof was then felted to temporary protect it from the forecast rain and when the weather again settles I will either tile it with the felt shingles you kindly provided or alternatively purchase some cedar shingles so completing the roof seal prior final wall weather treatment.


