
by Mark Bailey | Sep 15, 2013 | GardenLife Magazine
How many times a year do parents suggest – vainly – that their kids take a break from the screen and go out into the garden? Enough times for most of us to lose count. But one reason why gadgets win out over gardens is that most of our gardens just aren’t that child-friendly. Parents often think that a child-suitable backyard involves a plain expanse of grass with minimal plants to be crushed or decapitated by footballs and other missiles. But, if you think about it, even the most imaginative child can’t do much with a bare lawn.
So, if you really want to get the kids out into the garden, try some of the following.
Break up the layout
The best kids’ gardens are broken up into different areas. Screens, trellises and hedges can create different zones for hide and seek or dens. Children like having their own “secret” places in a garden, where they can retreat from parents or siblings, or hold court to their toys, and you don’t need a large garden to achieve this.
Add play spaces or equipment
Timber play equipment, trampolines and play houses make the garden more attractive to your children and their friends, and there are affordable cabins to sort all ages – from storybook-style playhouses for younger children, to games dens for teens. The great thing about sheds, summerhouses and cabins is that they can evolve with your children – from Lego or doll space for a seven-year-old to a party or games room for sixteen-year-olds.
Invite in some wildlife
Wildlife makes a garden more interesting to most children. Birdfeeders can attract birds, and small damp corners are excellent for mini-beast hunts. Plants such as buddleia, lavender and asters (michaelmas daisies) attract butterflies. For a more examples of butterfly-friendly plants, check the Royal Horticultural Society website.
Even dig up the lawn?
The problem with grass is its inability to survive football games, bowling practice or rugby tackling – at least long-term. So parents with sports-mad children may consider artificial grass. It won’t turn brown halfway through summer, or into a mud patch in winter. And premium artificial grass even contains different shades of green, making it look realistic.
Don’t be too precious
 Put yourself in your kids’ shoes. You’ve been forced to turn off the TV, and cajoled into playing in the garden. But at the first kick of the football, a parent shouts at you to “Watch out for the plants”. It’s not exactly a recipe for good times. If you do want to plant precious shrubs or delicate annuals, then go back to the zone idea: let the children have free rein in most of the garden, in return for having a no-go zone where you can grow things.
But do be safe
- Steer clear of plans like laburnum, lily of the valley and foxglove, which are extremely poisonous.Other common plants can also cause stomach upsets, or irritate skin or eyes – if you want to know more, there’s information on websites like the Royal Horticultural Society (www.rhs.org.uk).
- Have a garden storage shed or chest where you can lock garden tools, lawnmowers, fertilisers and pesticides well out of reach of children. And if you do use chemicals such as pesticides, then never use the same watering can that you use for watering or that children may use.
- When installing play equipment, follow guidelines about safe surfaces, falling distances and ‘fall-out’ widths.
- Sandpits are a wonderful thing, but not if they become the chosen litter tray of the neighbourhood cats. If you do have one, make sure it is fully covered when not in use.
Hopefully some of these useful pointers will help you to design a child-friendly garden that the entire family can enjoy!
by Mark Bailey | Aug 5, 2013 | GardenLife Magazine
It may be summer now, but in no time at all the nights will be closing in, the temperature will drop and we’ll be heading into winter. With rain, floods, ice and snow the winter commute can bring misery to a lot of people – getting stuck in snow, car accidents and slow traffic in poor weather are just a few of the regular problems. So how do you avoid commuting in winter? Why not consider working from home?
There are lots of advantages to work from home (or teleworking or remote working), including:
- more time with family
- reduced carbon emissions from commuting
- less money spent on travel
- and people being able to do their jobs better
When phone company O2 shut its UK headquarters for a day in 2012 and let over 2,500 staff work at home, 88% of employees said they were at least as productive as on a normal day at the office, and 36% said they were more productive. So tell that to your boss!
Other benefits of the O2 day of home-working were:
- staff saved 2000 hours of commuting time, which they spent either working, with family, staying in bed a bit longer or relaxing.
- and they saved nearly £9000, mainly in travel costs.
But can you get your work done and resist the fridge and TV? If you do convince your boss you should telework, or even decide to set up a home business, there are a few practical issues you need to think about. First, where will you work? It’s OK checking your emails in front of the TV in the evening, but doing your job full-time on the sofa is a different kettle of fish. Your back will be killing you by the end of the first week.
If you’re lucky enough to have a spare room or office, that’s a great start, but even then there are distractions. A global survey by Regus found that almost six out of ten people say it’s hard to work at home because of family demanding attention. There are also temptations – not just the TV, but Facebook, Twitter, and the call of the biscuit tin. Even with the best intentions, it’s easy for a ‘quick’ coffee and a go on the Playstation to fill a morning.
The remedy’s in the garden – for many people, the solution is to designate a separate space for working, so they’re not annexing the sitting room, and not being distracted by family, tech or fridge. Much cheaper than moving to a new house with an extra room, or building an extension, is to look at garden offices – timber buildings that are warm, solid and insulated enough to work in all day long, and all year round. They’re a more impressive place to meet customers than your spare bedroom, and they can add to the value of your home. GardenLife has a number of garden rooms and offices starting from around £1900.
Tips for choosing a garden office
If you do decide to build a garden office, be sure to remember the following:
- choose a building with thick enough timber (at least 44mm) to make it warm enough all year around
- designs with double-glazed windows keep in heat
- solid lockable doors provide extra security against theft – important if you’re going to install computers and other office equipment
- pick a design and layout that match the nature of your work – for example, do you need storage space? And would a traditional or contemporary suit your image better?
- check local planning regulations to see whether you need planning permission – with many garden cabins and offices, you do not need it.
So what will it be? A wet, cold view through a steamed up windscreen of the same old traffic jam, or a cosy desk in a timber garden office with a view of the garden?
by Mark Bailey | May 1, 2013 | How to guide
To the uninitiated buying a log cabin from a position of little knowledge of the product can be a confusing business. Please see below a list of criteria and definitions to look in to when purchasing. Hopefully this guide will help to point you in the right direction!
Log thickness – this is the thickness of the wall log. These can vary from 28mm thick up until 70mm and even thicker for larger accommodation type buildings. Generally garden buildings will have a log thickness of 28mm or 44mm. For all year round usage you really want a minimum of 44mm but for summerhouse usage the majority of buildings have a 28mm wall thickness. For larger games rooms and amenity cabins people generally go for 70mm log walls or 88mm for holiday type chalets.
Window and door quality – these can vary vastly from manufacturer to manufacturer. Key points to establish are whether the windows and doors are double glazed or not. Generally for all year round usage it is recommended that you have double glazing. Thickness of double glazing can also be a factor and always wise to check both glass thickiness and width of cavity separating glass. The larger the cavity the better the double glazing ! Some suppliers also use laminated timber in their window and door frames which helps them to remain more stable. Laminated timbger helps prevent movement caused by uptake of moisture. Where non laminated timber has been used warping can distort frames which brings with it associated problems of leaks and drafts. Some log cabins also have “top hung” windows which do not allow them to open fully.
Floor and ceiling material – be sure to establish both floor and ceiling material is tongue and grooved softwood timber rather than chipboard or other mixed fibre type boards. Floor thickness can also be an issue – floorboards generally come in 19mm or 28mm thickness. Likewise roof boards can come in 16mm/19mm or 28mm thickness. Obviously the thicker the timber the longer lasting the floor. Thicker timber will also give a better insulation.
Roof purlins – most log cabins have roof purlins which run from apex to apex. An indication of the quality of the cabin can be the thickness of these purlins. Thicker purlins also have a greater aesthetic appeal!
Hopefully some of the above pointers of use – it is worth making sure you buy the right log cabin for the purpose you wish to use it for!
We are always happy to answer any general enquries at info@gardenlifelogcabins.co.uk
Happy cabin hunting!
by Mark Bailey | Feb 25, 2013 | Customer feedback
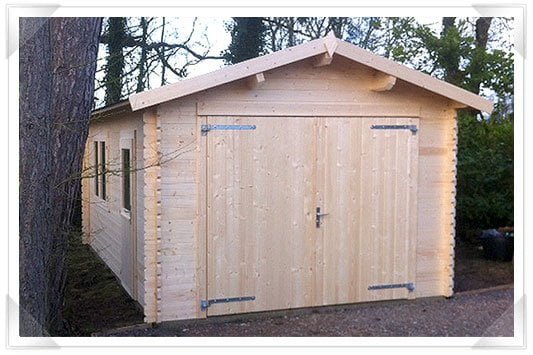
Delightful feedback from one of our customers. We know how good the quality of our timber garages is (even those in the economy range) but it’s always nice to get confirmation from a satisfied customer. “Took delivery of my timber garage yesterday, quality far better than I expected, thankyou for a very fast and friendly service. Will be more than happy to recommend your products to my family and friends. Pass on my thanks to the delivery team, again very friendly and helpfull.” Steve Johnson, GardenLife customer.
by Mark Bailey | Jan 28, 2013 | Log cabin news
New more relaxed planning regulations are set to make making improvements to your home simpler and less hassle. Those looking to expand living spaces by building conservatories , loft conversions and extensions should be abloe to do so more easily when new much talked about planning regulations come in to force. What is not talked about so much however is the average cost of undertaking such projects and the difficulty in raising finances to complete them. The average cost of adding a conservatory to your property is £22,000.00 (Ref Your Money – Daily Telegraph 15/09/12)and a loft conversion even greater at £33,800.00. New concrete garages come in at an average of £14000.00. Should homeowners not have these kind of funds readily available they may struggle with extra lending from their mortgage providers and or other banks. New banking guidelines have made new applications for borrowing open to much greater scrutiny and some homeowners may find they might not even qualify for their existing mortgages should they apply for them today. New planning policies may therefore be set to come in to place but with financing options becoming so much more difficult we question whether they will have much effect in stimulating smaller building and construction projects that they have been designed to do.
Here at GardenLife we have found an increasing trend towards creating this space with log cabins and other garden buildings – a much cheaper and hassle free option to adding some space to your property. Certainly with the costs of moving increasing so much over the past few years there is more emphasis on improving rather than moving ! Please have a look at our extensive range if thinking of going down this route but dont have large funds to take on the more expensive options.

by Mark Bailey | Nov 13, 2012 | Customer feedback
At GardenLife we appreciate all customer feedback and strive to ensure the best possible service. It’s always rewarding when we receive testimonials from delighted customers: “This summerhouse is perfect for my garden! The standard is a very high quality finish and I would recommend GardenLife to anyone wanting to improve their garden.” Patricia, GardenLife customer.
![How to erect a summerhouse]()
by Mark Bailey | Oct 30, 2012 | Customer feedback, How to guide
At GardenLife Log Cabins we always love receiving reviews and testimonials of our products from customers. Some recent feedback was so detailed however that we’ve decided to include it in our blog as a guide to other customers wishing to assemble the Hanna summerhouse themselves:
 “Thank you for your advice on the telephone on Monday which was greatly appreciated. Following your advice I decided to fabricate an adjustable height support pole from a scaffold pole and then fitted to the top of the pole a steel hexagonal plate that would support all 8 roof sections at the correct centre height. I bolted the centre of the pole support base to the centre of the summer house concrete platform and then 4 way guyed the pole to ensure it was both secure and centre vertical. I surrounded this pole with a scaffold tower to create a support platform from which the panels could then be be manually adjusted into position on the hexagonal plate. Weather remained kind and rain was not forecast until Saturday night so left time to Cuprinol seal and protect the wood of the wall and roof prior to final completion.
Saturday morning arrived and my brother and son-in-law arrived. All eight panels were slid into place by two of us pushing them up towards the centre support with the third person on the scaffold tower juggling the panels onto the steel hexagonal plate, following which, as suggested by you, the panels were then temporary secured with one centre screw at the roof panel’s base so allowing flexibility to adjust during positioning of all the other panels. A certain amount of juggling and adjustment was required to settle in the 8 panels onto the wall but all this was completed within an hour and we were having a celebrational coffee by 11 am.
 The roof was then felted to temporary protect it from the forecast rain and when the weather again settles I will either tile it with the felt shingles you kindly provided or alternatively purchase some cedar shingles so completing the roof seal prior final wall weather treatment.
Thank you again for your help and guidance with the completing of the roof which, due to its weight was originally an onerous task, but after thinking about and putting your comments into action was quite straightforward process. Finally the engineering/manufacturing of the walls, windows, doors and panels panels was all to a very high standard and the quality of the summerhouse, when completed, will be excellent.
Thank you for stocking and marketing a quality product and assisting me with the initial purchase, delivery and building considerations.”
Well there you go; a customer’s guide on how to erect the Ribble summer house!


